Linux Disk (Re)Formatting

esp. USB external drives

esp. via GUI utilities

(on a computer using Ubuntu 9.10)

This is the disk 'Format' dialog window
that appears after clicking on the
desktop icon of a disk drive ---
on the Gnome2 desktop of Ubuntu 9.10.

Home > RefInfo menu >

Computer topics menu (Linux section) >

This Linux Disk Formatting page

! Note !
A few more notes and images may be added,
if/when I re-visit or use this page.

INTRODUCTION : (2011 Aug)

In a web page on 'rsync', I described how I use the Linux 'rsync' command to backup files --- in particular, all the files in my home directory --- to an external USB disk drive.

Ordinarily, when you buy an external USB disk drive nowadays (2011), it is pre-formatted in a Microsoft file system format such as 'NTFS'.

    (USB 'stick' drives are usually formatted in an older Microsoft file system format such as 'FAT32'.)

On my five or six Linux computers (desktops, laptops, netbooks), my '/home' file system is in a Linux file system format such as 'ext3'.

In using the external USB disk drive with the 'rsync' command, to backup my home directory, I want to keep the files in an 'apples-to-apples' file system environment --- that is, the same file system format

  • on my computer hard drive

and

  • on the external USB disk drive.

Hence, I backup to a Linux format, such as 'ext3'. That is, I reformatted, to 'ext3' format, the 5 or 6 USB external disk drives that I use for backup --- of several desktop computers and several netbook & laptop computers.

Following are notes on how I typically do the reformatting --- using GUI utilities available via the Gnome2-Nautilus desktop environment, such as that found on Ubuntu 9.10 ('Karmic Koala').


Relative cost of USB disk drive versus USB 'stick' :

For cost reasons, I use a disk drive (with rotating platters) rather than a USB stick (solid-state memory).

The cost of a typical 500 GB USB external disk drive nowadays (mid-2011) is about $50 (on sale). That is about $0.10 per Gigabyte.

The cost of a typical 64 GB USB stick (the largest size available in local stores, like Best Buy and Office Depot, circa 2011) is about $80 (on sale). That is about $1.25 per Gigabyte --- over 10 times the cost-per-Gigabyte of an external USB disk drive (rotating disk, non-solid-state).

Besides the cost, I usually want a disk drive with at least 160 GB or 320 GB of capacity. Since it is not easy to find USB 'sticks' with such high capacities, this is one more reason not to use USB 'sticks' for large-scale backup --- where by 'large-scale' I mean backups on the order of 100's of Gigabytes.


Steps in Formatting an external USB disk drive :

The following steps are for a Western Digital 'portable' external USB disk drive with the pre-set volume ID 'My Passport'. If you follow these instructions for another disk drive, be aware that some names, such as 'My Passport', will be different in your case.

Step 0:   (clean off the drive)

The typical USB disk drive is shipped with a bunch of files (executables and associated files) for use with Microsoft or Apple operating systems, to do backups. I do not need these files since I use 'rsync' as described in a web page whose link is above.

I connected the USB connector of the external disk drive to my computer (either desktop or netbook) with Ubuntu 9.10 ( Gnome2 desktop environment and Nautilus file manager) installed.

In the Gnome2 'Places' menu, a 'My Passport' entry showed up. Clicking on that entry brings up the Nautilus file manager positioned in the 'My Passport' directory (volume) of the '/media' directory.

I opened another instance of the Nautilus file manager and made a new directory under my home directory (with a name like 'WesternDigital_250GB_MyPassport'), and dragged the Microsoft and Apple files and directories to the new home directory. This left a 'clean' external disk drive --- still formatted as an NTFS file system.

Step 1:   (searching for a 'Format...' option in right-click menus)

First, from the top Gnome2 panel, I tried going to 'Places > My Passport' and positioning to the '/media' directory with 'My Passport' showing as a directory. Then I right-clicked on the 'My Passport' directory name and looked through the 'right-click-menu' that popped up (image below).

The menu image above is what I saw. It had no 'Format...' option. It would ordinarily appear near the bottom of Gnome2 right-click menus that look like this.

I noticed that there was a 'My Passport' icon on my desktop that showed up after connecting the external USB drive to the computer. I right-clicked on that desktop icon, and the following right-click-menu showed up.

Note that it is similar to the previous right-click-menu, but it has a 'Format...' option near the bottom of the menu.

I clicked on that and saw the following 'Format' dialog panel.

Step 2:   (choose file system type & enter a volume ID)

From the 'Format' dialog panel that popped up, I chose 'ext3' instead of 'FAT', and I entered a Volume ID of 'WD_250BG_MyPassport'.

    (A max of 16 characters is accepted, so I ended up with a vol-ID of 'WD_250BG_MyPassp' --- which was OK with me.)

Step 3:   (Re-format the drive)

I clicked on the 'Format' button and the 250GB drive was formatted in about 4 minutes.

    Note that there is a 'DiskUtility' button on the lower left of the 'Format' dialog panel. Clicking on this button will bring up another disk formatting utility called 'Palimpsest'. Its GUI is seen just below.

When you click on the FileSystemTypes button of the 'Palimpsest' GUI, you see a popup menu of many file system types --- starting with more than a dozen Microsoft file system types.

If you scroll down this list of file system types, you will see some Linux file system types --- and file system types for other Unix-like operating systems, like FreeBSD. The image below shows the file system types at the bottom of the list.

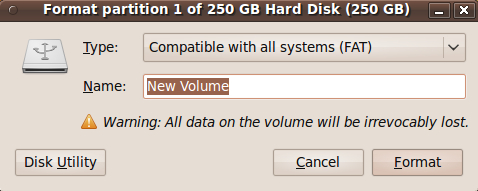
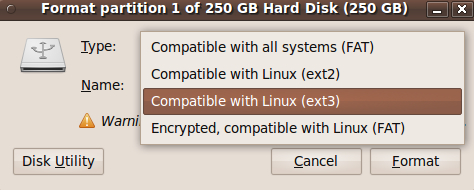
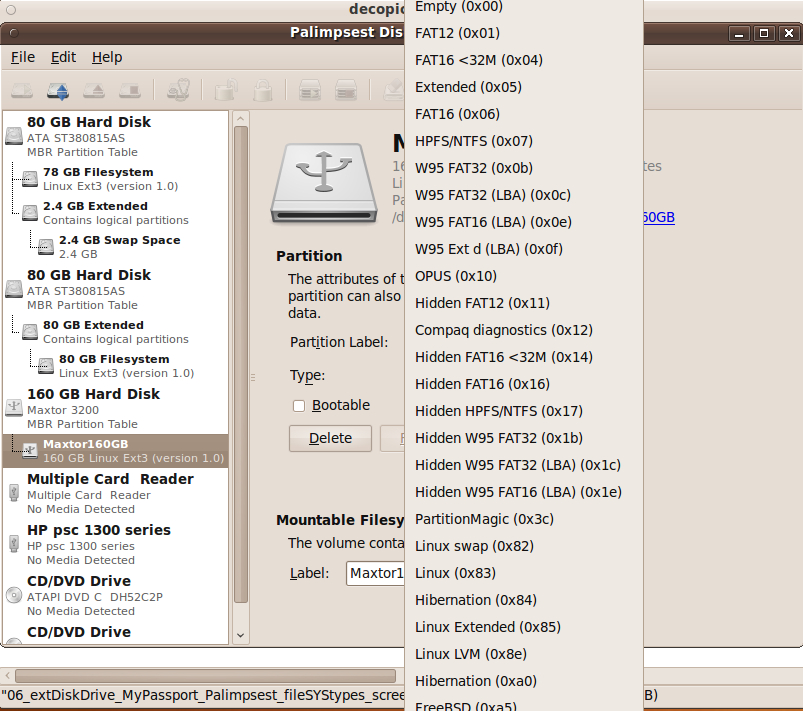
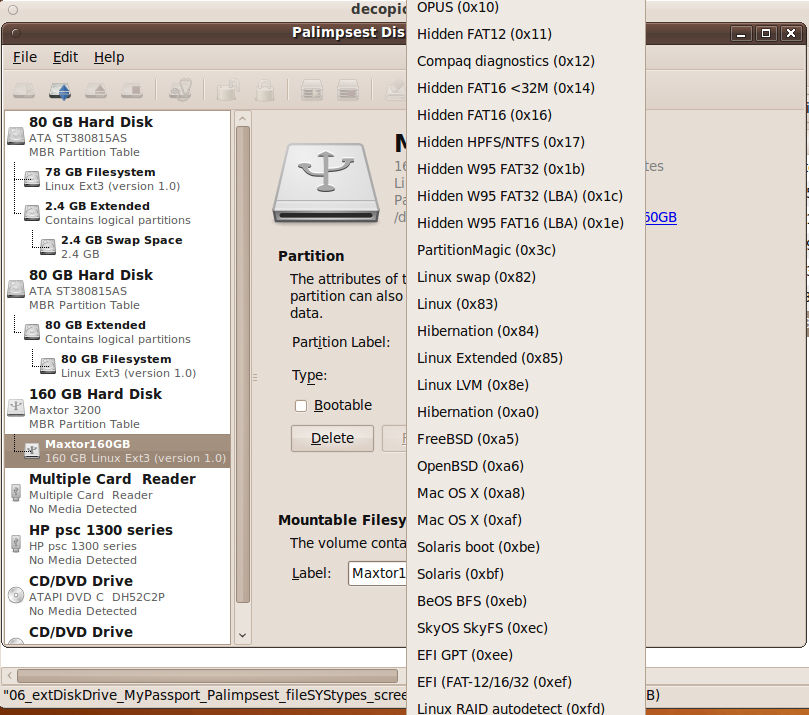
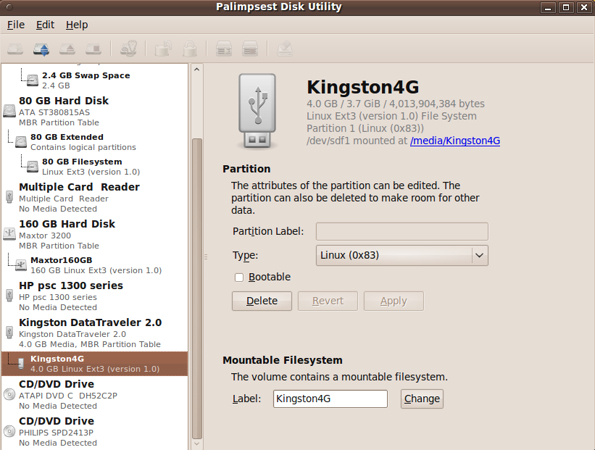
    For some reason, the Linux file system types are not specifically labelled with types like 'ext2', 'ext3', or 'ext4'. It seems the Palimpsest utility is more oriented to formatting drives on Linux systems to Microsoft formats. So I was happy to stick with formatting via the lower-right 'Format' button on the 'Format' GUI.

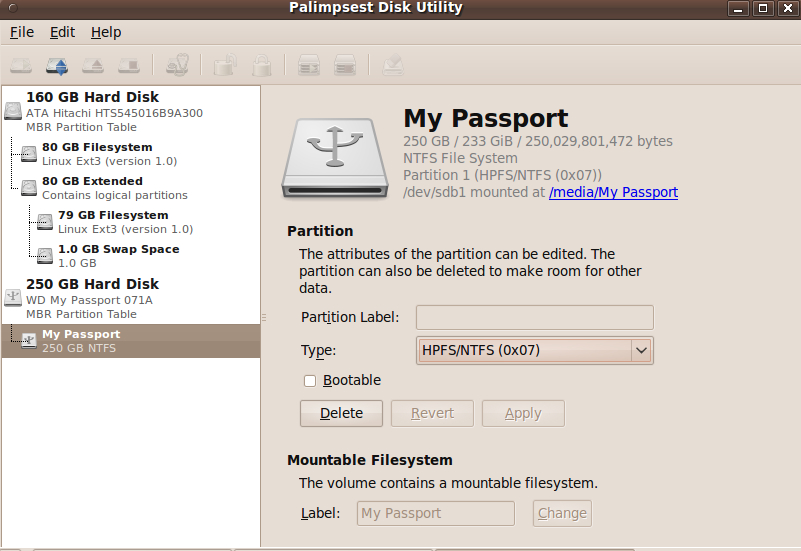
    By the way, on the upper Gnome2 panel, you can use 'System > Administration > Disk Utility' to start up the Palimpsest GUI. This is an alternate method of getting to that GUI.

Step 4:   (Prep the 'rsync' backup script)

I used Nautilus to make a '$HOME/Rsync' directory and prepared a one-line script to issue an 'rsync' command to backup my home directory to the directory

/media/WD_250BG_MyPassp/home/userid/

This is fully described on my 'original' (circa 2010) web page on making 'rsync' backup scripts.

I made the 'home' and 'userid' subdirectories of the '/media/WD_250BG_MyPassp' directory. I used the 'File > Create Folder' option of the Nautilus GUI.

Step 5:   (Run the first backup)

After setting up my 'rsync' script as a desktop icon called 'bkup_2wd250GB', I clicked on that icon to start the first backup to the new external USB disk drive.

I had used the 'xterm -hold' technique in the 'rsync' script so that a shell window would popup and show messages coming form the 'rsync' command --- the messages triggered by use of the '-v' (verbose) option of the 'rsync' command.

It took about 21 minutes to backup about 26.8 GB of files that were in my home directory. This is a speed of about 20 MB per second. Not bad. Much faster than the 4 MB per second that was typical of disk drives in the mid-1990's.

I have found by experience that future backups (of file changes) will proceed in less than a minute.

I run the 'rsync' backup script (via a click on a desktop icon) just before logging out --- at the end of login sessions in which I change or create quite a few files.

It turns out that 'rsync' can scan my 27 GB (or so) of files in a little less than a minute (on a USB 2.0 connection), to determine the files that I have changed, deleted, or added.

There are usually less than 100 file-changes in my typical login session --- a very small percentage of the thousands of files in my home directory.

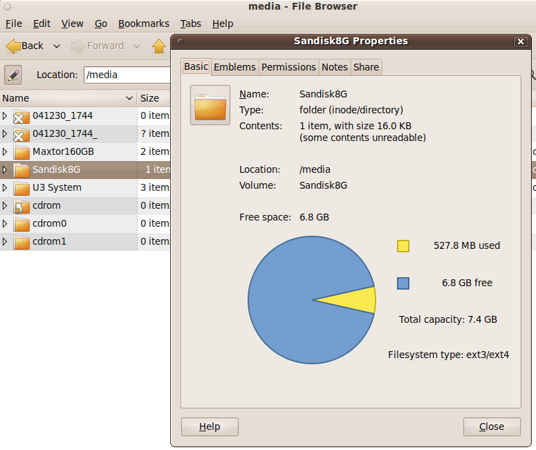
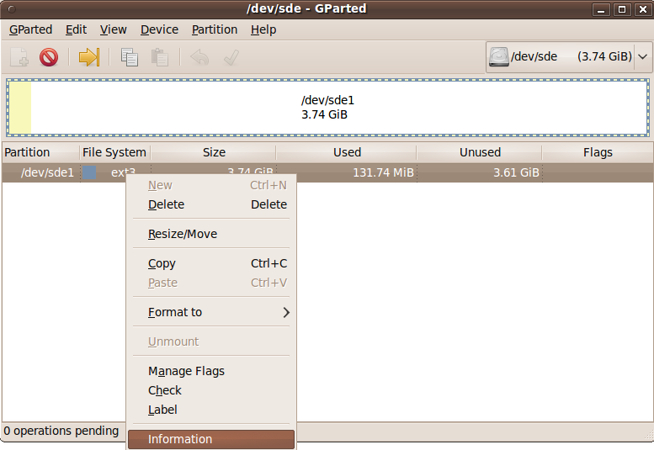
Step 6:   (Check the results of the first backup)

After the first backup ran, in Nautilus I navigated to the directory '/media/WD_250GB_MyPassp', right-clicked on that directory name, chose 'Properties' at the bottom of the right-click-menu that popped up, and the following statistics were shown:

    61,892 items totalling 25.0 GB

    37.0 GB used
    192.2 GB free

    Total capacity: 229.2 GB

    File system type: ext3/ext4

Note that the first line indicates I have about 25 GB of files, but the 2nd line indicates that 37 GB is used. It looks like there is about 12 GB unaccounted for.

Is this 'ext3' file system overhead? (12 GB is about 5% of the 229.2 GB capacity.)


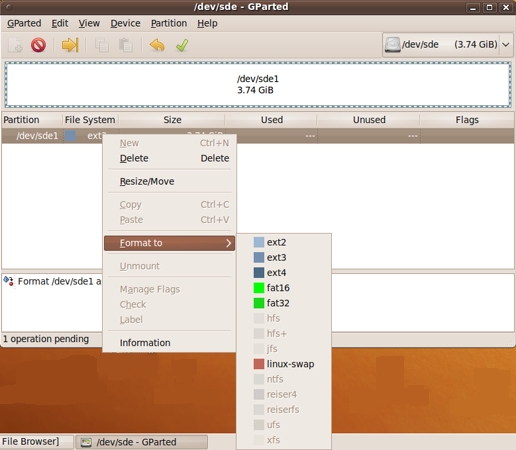
Summary (Conclusions) :

I post these disk-formatting instructions here mainly for my own use --- to help me when I am having a 'senior moment' and can't remember how I got to 
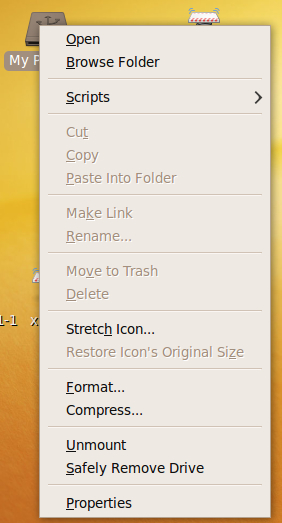
the 'Format...' option. The option can be hard to find since I only format disk drives a few times a year (or less) --- and because at least one Gnome2 
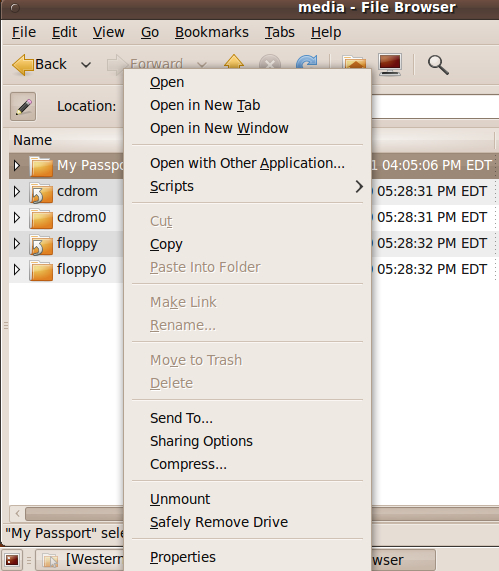
right-click menu does NOT contain a 'Format...' option. The trick is to find the right Gnome2 right-click menu --- when doing the formatting via GUIs.

Note that about the only place in which Linux commands were used in this procedure was in writing the 'one-line' 'rsync' script to do the periodic backups. And even in that situation, I do not use a command terminal prompt to issue the command. Rather, I click on a desktop icon for the rsync-script.

I love the powerful command line, but I am a terrible typist. So, except for the simplest commands, I put commands in a script as soon as possible --- so that I do not have to keep (mis-)typing the same commands and parameters over and over, as I change the commands and/or parameters. (It doesn't seem nearly as bad to make typing errors in a text editor when editing the script.)

These instructions may serve to help others format an external USB disk drive and prepare it for use to backup files on a Linux system, say with 'rsync'. I hope these instructions may be of help to other Linux users.
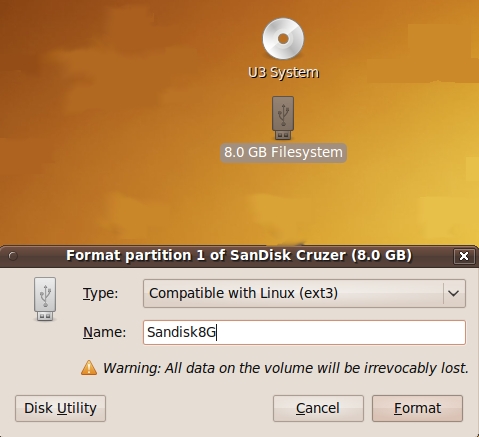
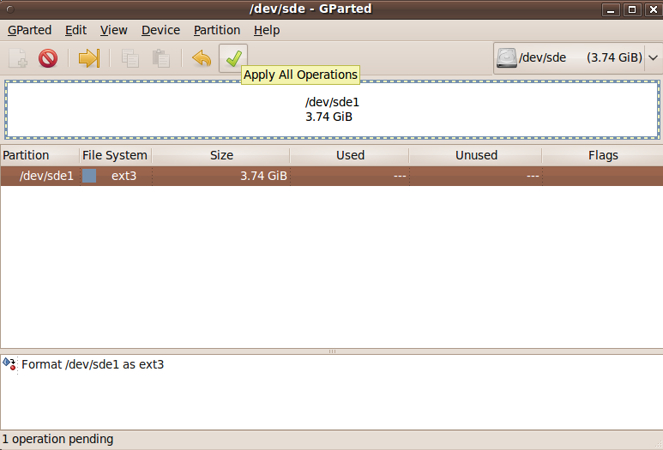
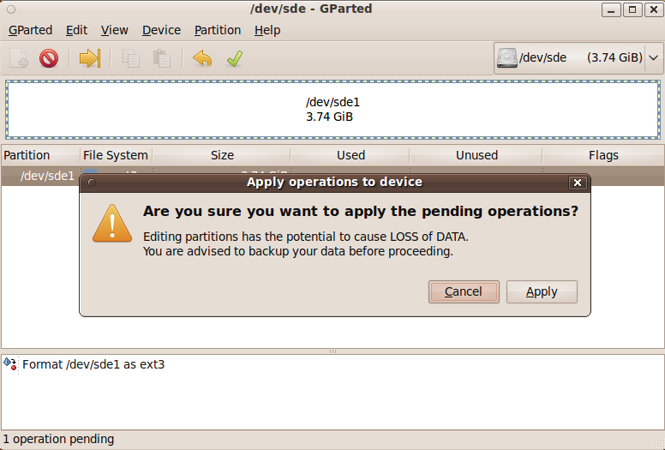

Addendum :

Below, I have added notes on how to reformat a USB 'stick' (solid state) drive from 'FAT32' to another format --- 'ext3'. In other words, the notes describe how to change a USB stick from a Microsoft file-system format to a Linux format.

    (In the past, I have had to re-format a USB stick from 'FAT16' to 'FAT32' --- or was it 'FAT' to 'FAT16'? --- in order to use the full capacity of the USB stick. I did that in a Microsoft operating system like Microsoft XP. If I ever reformat from one Microsoft format to another, on Linux, I may add notes describing that process here.)

Someday, I may add notes on how to do storage device re-formatting via commands at shell prompts (or in scripts), rather than using these GUI methods.

If I ever use 'Palimpsest' to format a storage device, I may put those notes here as well. 'Palimpsest' might be useful in changing from one Microsoft format to another.

(RE)FORMATTING USB STICKS to 'ext3' : (2011 Aug)

Below, I describe how I have reformatted a couple of USB sticks (an 8GB Sandisk USB stick and a 4 GB Kingston USB stick) to 'ext3' from a Microsoft format, like FAT16 or FAT32.

The two techniques that I used on these two 'sticks' are different, because in the case of the Sandisk stick, it automounted successfully and I could see it in the Nautilus file manager GUIs.

I could use the Format option of a Nautilus right-click menu to format the Sandisk stick.

But the Kingston stick would not automount --- neither on putting the stick in the USB port after login, nor before login.

After a quick Google search on terms such as 'how to format usb stick ubuntu', I found that using the 'Gparted' partition editor was one way to go.

Gparted is available on Ubuntu 9.10 via the 'System > Adminisration > Gparted' path of the top Gnome2 panel.


FORMATTING the Sandisk STICK, using Nautilus :

You can see in the image below that when I put the Sandisk stick in a USB port, on my Ubuntu 9.10 computer, it automatically created a desktop icon called '8.0 GB file system'.

When I right-clicked on the '8.0 GB file system' icon, a Nautilus right-click menu popped-up with a 'Format...' option near the bottom of the menu. When I clicked on the Format option, a GUI dialog appeared, as shown in the image below.

I changed 'Type' from 'FAT' to 'ext3' and entered 'Sandisk8G' for a Volume ID. Then I clicked the Format button, and the format took about 3 minutes to complete.

An image of what the Nautilus 'Properties' option showed, after the ext3-formatting was done, is shown below.

    A Side Note :

    When I inserted the Sandisk stick in a USB port on my computer, the 'U3 System' desktop icon (seen in the image above) was also created for the Sandisk stick.

    When I first used a Sandisk stick, on a Microsoft operating system, I found that it had some offensive software (for backups and other stuff) that tried to run automatically when I used the stick, and I could not remove the software.

    After some web searches, I found that Sandisk puts the software in a separate partition on the USB stick and that partition emulates a CD disk. The 'U3 System' desktop icon represents that second partition of the Sandisk USB stick.

    I found that Sandisk provides, via one of their web pages, some software that you can download and use to remove the offensive, space-wasting files on the USB stick. BUT the software is not easy to use, because it sometimes does not recognize the USB stick.

    After several attempts (logoff-logon and/or remove-reinsert USB stick), I was able to get the software to work on one Sandisk stick.

    I never used the software (written for use on a Microsoft OS only) on this Sandisk stick, so the offensive CD partition and files are still on this stick. Perhaps someday I will find a way to remove the files from this stick, on Linux, but the partition takes only about one-tenth of a Gigabyte, so I leave it for now.

    When I did the web search on how to remove the Sandisk software, I found many other people did not want the software and were frustrated by the fact that the software was not easily removable by simple means, like drag-to-trash.

    Some people said they would never buy a Sandisk USB stick again. I too plan to avoid buying Sandisk USB sticks in the future. Unfortunately, I bought three in a package and was stuck with several.

    I prefer Kingston USB drives, but I have many others, including HP (from BigLots), PNY (from BestBuy), DaneElec (from Target), GigaWare (from RadioShack), Ativa (from OfficeDepot), Verbatim (from OfficeMax), Transcend (from an Internet seller, TigerDirect?), and Toshiba (from Office Max). No more Sandisk --- which I believe I got at Costco, in a package of 3.

Note that although this is an 8 GB stick, 'Total Capacity' shows as 7.4 GB. Not all of that 0.6 GB difference is due to the CD-like partition on the stick.

Furthermore, the 'Properties' display shows 527.8 MB used, even though there are no files in the partition yet.

Perhaps there is some kind of 'overhead' of the 'ext3' file system. (527.8 MB is about 7% of the 7.4 GB capacity.)

In any case, I was able to use Nautilus to drag some directories of files onto this 'ext3' Sandisk partition, in order to backup the files in those directories.


FORMATTING the Kingston STICK, using Gparted :

As I mentioned above, this Kingston 4GB stick would not automount under Ubuntu 9.10. (I forget if I tried to re-format this stick in the past, and, perhaps, fubar-ed the file system on the stick.)

In any case, as I mentioned above, I found that 'Gparted' should allow me to format this stick. When I brought up 'Gparted', via 'System > Administration > Gparted', it was busy for about 10 seconds analyzing the devices and file-systems on my computer.

When it was done, '/dev/sda' showed in the drop-down button at the upper-right of the Gparted GUI. I clicked on the drop-down button and chose '/dev/sde'. (I had verified, with the 'sudo fdisk -l' command, that '/dev/sde' was a 4 Gigabyte device.)

I right-clicked on the '/dev/sde1' line in the middle of the GUI and, from the menu that popped up, I chose 'Format to' and 'ext3'.

This put a pending operation at the bottom of the GUI --- 'Format /dev/sde1 as ext3'.

In the image below, you can see that the check-mark icon at the top of the GUI is labelled 'Apply All Operations'. I clicked on that to start the formatting. The formatting took about a minute.

Before the formatting started, I got the following warning popup --- a warning that data should be backed up. (Hopefully, they are simply referring to the data on the USB stick, and not the data in my root and home partitions. In any case, I backup my home partition almost daily --- every time I make significant changes.)

After the formatting was complete, you can see in the following image that the 'Used' and 'Unused' columns were filled in --- with 131.74 MB and 3.61 GiB, respectively.

Since I had not (yet) put any files on the USB stick, I guess that the 131.74 MB (about 3.5% of the 3.74 GiB) is due to some kind of 'overhead' of the 'ext3' file-system.

In any case, it looks like about 3.61 GiB of the '4 GB' USB stick is usable for my files.

I right-clicked, again, on the /dev/sde line, and chose 'Information' this time, instead of 'Format to', from the popup menu. The menu is seen in the image above.

Below is an image of the 'Information' panel that popped up.

This image confirms that about 3.61 GiB are available, that the 'overhead' amounts to about 3% of the available space, and that the file system is now an 'ext3' file system rather than a Microsoft FAT file-system.

Futhermore, after the formatting, I found a desktop icon labelled '4.0 GB Filesystem'. And when I popped down the 'Places' menu from the top Gnome2 panel, I saw an entry named '4.0 GB Filesystem'.

When I used Nautilus to Open the desktop icon, I found that I could not create a 'folder'. Apparently, the partition was owned by 'root' and did not allow the 'world' to create directories in the partition. Nor could I drag files to the partition --- 'Paste' was grayed out.

But I was able to open a terminal positioned at the directory '/media/0b74f5f0-ab69-44c9-b42b-5f33dab3fa5a' assigned to the USB stick, and I made an 'apps' directory, owned by me, with the following two commands.

    sudo   mkdir   apps

    sudo   chown   myuserid.myuserid   apps

I was then able to drag my 'apps' subdirectories into this 'apps' directory, for backup.

So the formerly unmountable Kingston drive is now useful. And I am able to drag my files from an 'ext3' file system on the hard disk of my computer to an 'ext3' file system on the USB stick.


Changing Volume ID :

After re-formatting the Kingston 4GB USB stick, the next time I logged into a new Linux session, I plugged the USB stick into a USB port to see if it would be automatically be recognized --- and, if so, what it would use as a directory name (volume ID) in the '/media' directory.

About 10 seconds after the stick was plugged in, a desktop icon appeared, with the name '4.0 GB Filesystem'. When I right-clicked and Opened the file-system, it was using the 32-character (plus 4 hyphens) subdirectory name of '/media' --- namely, '/media/0b74f5f0-ab69-44c9-b42b-5f33dab3fa5a'.

So I closed the Nautilus GUI and right-clicked again and chose 'Format...' this time. The following 'Format' GUI appeared. Note that it defaulted to formatting with FAT rather than the new 'ext3' format of the USB stick.

I clicked on the 'Disk Utility' button to bring up the Palimpsest GUI. I decided, what the heck, I'll try the 'Label-Change' option at the bottom of the GUI.

The 'Change' button was grayed out, but as I keyed in the name 'Kingston4G' into the 'Label' entry field, the 'Change' button changed to a non-grayed-out appearance, as seen in the image below.

I clicked on the 'Change' button and the Vol-ID was changed in less than a second.

So I found that 'Palimpsest' can be useful to quickly change the Vol-ID of a device like a USB stick.

FOR MORE HARD DISK FORMATTING INFORMATION:
(for Linux distros)

To find more information on disk formatting for Linux installs (especially Ubuntu 'distros'), you can try WEB SEARCHES on keywords such as the following.

You can also try Wikipedia pages like the following, and following links on those pages for even more information.

Bottom of this
Linux Disk (Re)Formatting page.

To return to a previously visited web page location, click on the Back button of your web browser a sufficient number of times.

OR, use the History-list option of your web browser.

OR ...

< Go to Top of Page, above. >

Page history:

Page was created 2011 Aug 17.

Page was changed 2011 Aug 27.

Page was changed 2018 Sep 02.
(Added css and javascript to try to handle text-size for smartphones, esp. in portrait orientation.)

Page was changed 2018 Dec 13.
(Some minor formatting changes related to the images.)

Page was changed 2021 Nov 18.
(Changed the HTML code for the images so that the images are sized in proportion to the width of the browser window.
I added a lot of Wikipedia links in the 'Introduction' section and some following sections.
Also did some minor reformatting and rewording on the page.
Also added a section of WEB SEARCHES for more information and current information on disk formatting for Linux.)