*mtPaint*
image editor
Notes
by Blaze

mtpaint 3.31 screenshot
with the 'Scale Canvas' dialog
that is used to resize an image
*mtPaint*
image editor
by Blaze |
mtpaint 3.31 screenshot with the 'Scale Canvas' dialog that is used to resize an image |
! Note !
More notes and links may be added
to this page, if/when I re-visit it.
< Go to the Table of Contents, below. >
(Skip the Introduction)
|
INTRODUCTION : The title above specifies 'Notes' rather than 'Guide'. Initially, this page is meant as a collection place for notes on using mtPaint (Wikipedia link). So initially, this page is 'Notes', NOT a 'Guide'. It will turn into a 'Guide' IF I ever collect enough notes that they can be organized into a fairly complete reference work for mtPaint. (That will probably never happen because there are many options --- and entire menus --- that I will never have a reason to use.)
A stumbling block to In a magazine review of 'mtPaint' in the 2009-2010 time frame, the author mentioned having a problem with how to cut-or-copy and paste (a portion of an image). I too had this problem. I finally found, via persistent web searching, a forum note that explains how cut-and-paste works in 'mtPaint'. The technique is really quite simple and powerful and well-implemented --- it's just that it is not intuitively obvious --- and it differs from the way 'Paste' works in similar light-weight image editor programs, such as 'Irfanview' (Wikipedia link) for MS Windows. The 'mtPaint' 'Paste' technique is the topic of one of the notes below. As mentioned in that note below, an apparent documenter of 'mtPaint' ('wjaguar' = Dmitry Groshev, who is also a maintainer) admits (in 2006) that this was an oversight in the 'mtPaint' documentation. The only way a person could deduce how cut-and-paste works, from the documentation, is from one line in the 'Appendix' on 'Keyboard Shortcuts', where it mentions that the Enter/Return key is the shortcut for 'Paste' --- or, more precisely, the shortcut for committing a Paste, after you have positioned an image segment where you want it. Nice basic features : I think 'mtPaint' is the best 'light-weight' image editor on Linux that I have found --- after extensive web searching to find a replacement for 'Irfanview' on MS Windows. I was looking for an editor (for JPEG, PNG, and GIF files) that accomplishes the five or so basic (interactive) image-processing functions that I typically have a need for:
[To handle some batch processing options of 'Irfanview', which are NOT available in 'mtPaint', I have devised some Nautilus scripts using ImageMagick. Those scripts are available via links elsewhere on this site --- and they are available as a package of 450-plus shell scripts at freedomenv.com.] 'mtPaint' also has 'layer' features and other features that I have not needed to try yet (in 2009-2010). So these notes do not initially deal with 'layers' and other 'exotic' features, and hence, initially, these are 'Notes', NOT a 'Guide'.
UPDATE: I eventually found the problem was a corrupted '.mtpaint' dot-config file in the home directory. Simply deleting/renaming that file and allowing 'mtpaint' to re-create it got me out of that jam. Since then, I have not tried using layers, and have had no real need to. Perhaps Groshev or some other maintainer will fix this in a future release. No tutorials ? I find it amazing (in 2009 and 2010) that there is so much written about GIMP in magazine articles, reviews, forums, etc. --- and almost nothing is written about 'mtPaint'. It is almost impossible to find a 'tutorial' on even a small 'mtPaint' project --- such as crop, resize, or copy-paste --- on the Internet in 2010. And yet 'mtPaint' does almost all the basics that your 'average joe' would need for image editing. So this is my attempt to start helping document 'mtPaint' a little more, if only for myself, to remind myself how to do things after I am away from the software for a while. This page will be a place to collect my notes (and screenshots) while using 'mtPaint'. In addition to notes, I may occasionally add links to web pages that provide useful info on 'mtPaint' --- especially info that fills in 'holes' in the built-in 'mtPaint' documentation (the 'handbook'). For convenience (easy reference), a 'local' link to an English version of the mtPaint documentation (the 'handbook') is in the 'Table of Contents' section below. And, if I can ever find any, I may provide links to tutorials on 'mtPaint' --- preferably links that look like they won't go dead in the next year or two.
The author --- 'mt' = Mark Tyler : The original author of 'mtpaint', Mark Tyler, has gone on to other programming projects, and Dmitry Groshev (mentioned above) took over as maintainer, circa 2008. Mark had an mtpaint-blog (link to mtpaint.blogspot.com) where he published eight, short 'how-to' guides. He has taken his programming skills and applied them to a different project --- mtCellEdit (link to mtcelledit.sourceforge.net) --- a spreadsheet program. Tyler has also packaged other utilities that he devised in doing that project --- such as a set of GUI-building utilities he calls 'mtMintKit' (link to mtmintkit.sourceforge.net), for 'Mark Tyler Minimal Tool Kit'. I hope that Groshev and others can keep 'mtpaint' available, through 2020 and beyond. There was a '3.40' version released circa 2012. Most of the images on this page are from version '3.31' or before. Installing 'mtpaint' on Linux : Although 'mtpaint' is not likely to come with a Linux distro 'out of the box', you can install the rather small 'mtpaint' package quite easily. If you type 'mtpaint' in a terminal window of a Debian-based Linux distro, you might get a message that you can install mtpaint with a command like 'sudo apt install'. Alternatively, when I installed version 18.04 LTS (LongTermSupport) of Ubuntu-MATE Linux (Wikipedia link) on a desktop computer around 2019, I started up the Synaptic Package Manager (Wikipedia link) by following the 'System > Administration > Synaptic Package Manager> menu path of the 'top-panel' of the MATE desktop environment (Wikipedia link). When I keyed the name 'mtpaint' in the Search option of Synaptic, it presented me with the option to install 'mtpaint' version 3.40-3, as seen in the following image. |
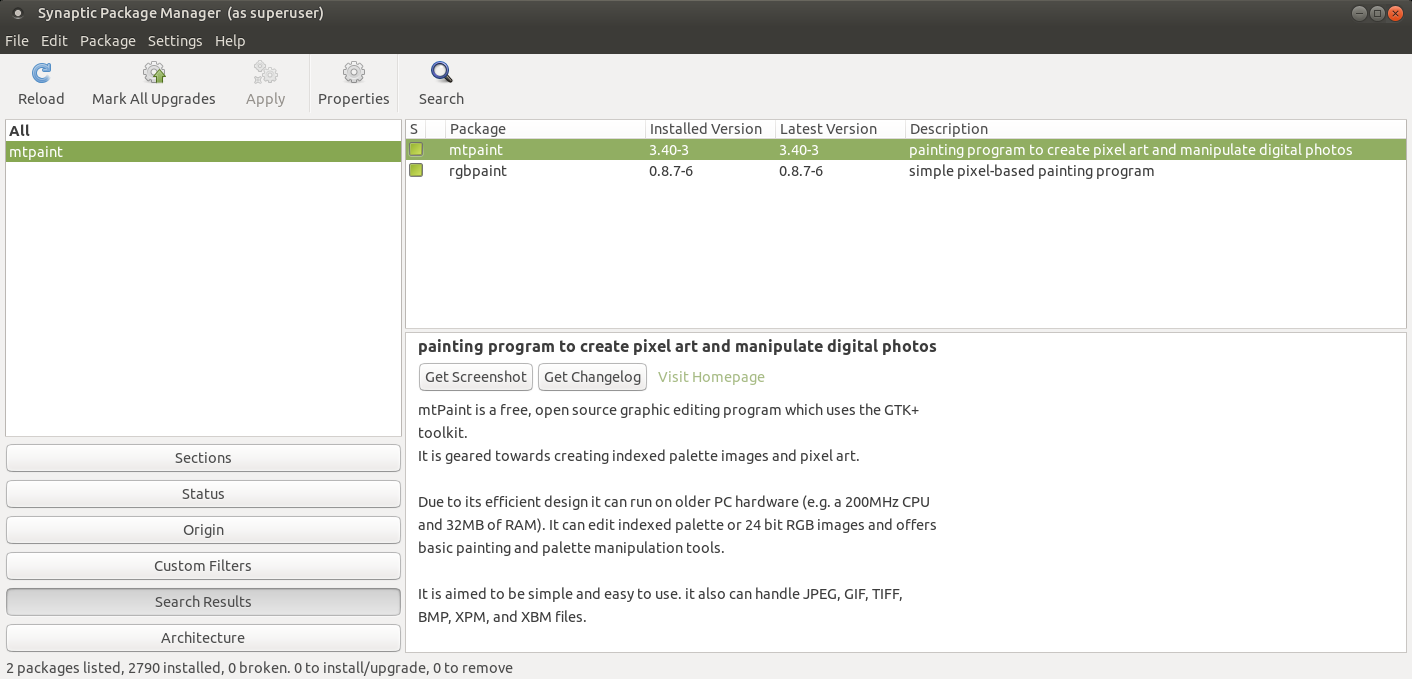
(You can right-click on this image and choose an option like
'View image' to see a larger or expandable view of this image.)
The 'rgbpaint' program showed up in the Search results,
along with 'mtpaint', because the word 'mtpaint' shows up
in the 'rgbpaint' description --- because 'rgbpaint' is a
simplified paint program that was derived from 'mtpaint'.
|
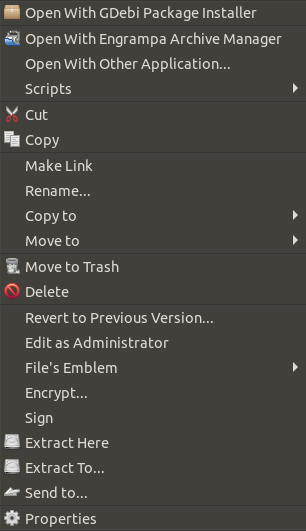
After I 'applied' the chosen-packages-to-install in Synaptic, 'mtpaint' was installed in a few seconds and the name 'mtPaint graphic editor' appeared in the list of Graphics programs that show when using the 'Applications > Graphics' menu path emanating from the 'top panel' of the MATE desktop environment. I also created a desktop icon for 'mtpaint' on the MATE desktop by right-clicking on the desktop to startup a 'Create Launcher' dialog window. You could also right-click on the 'top-panel' of the MATE desktop to create an icon to launch 'mtpaint' with a single-click of an icon in the 'top-panel'. (The 'top-panel' is always visible no matter how many windows you have open and covering your desktop.) Another possible way to install 'mtpaint' on a 64-bit (or old 32-bit) PC with a Debian-based Linux distribution is to download a binary build of 'mtpaint' from the past binary builds at snapshot.debian.org/binary/mtpaint/ (2007 to 2016 and beyond). The binary packages at 'snapshot.debian.org/binary/' are Debian '.deb' files. They can be installed by using the 'Gdebi' Package Installer GUI instead of Debian command-line programs like 'dpkg' or 'apt'. If you right-click on a '.deb' file in a list in the Caja file manager of the MATE desktop environment, you will get a pop-up menu and you can choose to run 'Gdebi' by clicking on the top-line of the menu, which is seen in the image below. |
|
You can see more information about 'Gdebi' (and 'dpkg' and 'apt') on the Debian Wikipedia page. You can do web searches for examples of using 'Gdebi' or 'dpkg' or 'apt' for installation of '.deb' files. Navigation of this page : To help find the notes on various 'Usage' topics, this page has a 'Table of Contents' that links to paragraphs further down the page. But that will not always be the best way to find information on this page, so ...
Note: |
![]()
'mtPaint' 3.10 screenshot
(Slightly out of date.
'mtPaint' was at version 3.31 in 2009.)
This image shows the 'Tranform Color'
dialog that I use to do 'gamma correction'.
For another 'interesting' image,
see an 'nl' (Netherlands) screenshot
near the bottom of this page.
|
TABLE OF CONTENTS : (links to sections below)
Mark Tyler's documentation :
Additional info ('external') :
END OF TABLE OF CONTENTS. |
|
mtPaint Copy/Cut-and-Paste : In mtPaint, paste works a bit differently from most other Paint programs. When the clipboard image appears over the canvas [after selecting a rectangular area and choosing Copy or Cut, then Paste], it is not yet pasted anywhere. The 'secret': After dragging it where you want it, press 'Enter' (or right click) to 'commit the paste'. If you want, you can repeat the process, to paste one selection into several places. When done, press 'Esc', or switch to another tool. Alternately, you can enable the "Changing tool commits paste" preference on the "Interface" tab, to get a more 'MS Paint' like behaviour. [I have not tried this "Changing tool commits paste" preference. I have not verified that it works. But I know it will not cause 'Irfanview'-like behavior. Before you choose to 'Paste' in 'Irfanview', you have to have a rectangular area selected. When you choose to 'Paste' in 'Irfanview', your image in the copy/cut buffer is scaled to fit into the new rectangular area selected. If you choose a different 'tool', the Paste is not committed in 'Irfanview'. Only by specifying 'Paste' --- by pull-down menu or by keyboard shortcut --- is the Irfanview 'Paste' committed.] Somehow Mark Tyler omitted the explanation of cut-and-paste when writing the manual (the 'handbook'). That little oversight has caused a lot of people to abandon 'mtpaint' in frustration. Pity. (Actually a small tragedy in my humble opinion. All his hard work has garnered very few devotees.) The 'mtPaint' manual hints (very briefly) at how to do cut-and-paste. See the manual Appendix: At Keyboard/Mouse shortcuts --- which is almost at the very end of the manual --- the manual says :
Some of the text above, on mtPaint 'Paste', was found in a forum page at murga-linux.com. I may add more complete info to explain the full steps of copy/cut-and-paste (including screenshots) at a later date. This information was enough to get me 'over the hump'. I trust it could help others as well.
2015 UPDATE: < Go to Table of Contents, above. >
The Toolbar Menus of mtPaint : There are nine toolbar menu options across the top of the 'mtpaint' GUI:
The menus that I use the most are
In other words, I hardly ever use the
drop-down menus. If you are looking for information on those options, I do not have any guidance here --- but the images of those drop-down menus are below. |

Here are the NINE toolbar menu names
--- and some icons by which you can
get to options without using the
drop-down menus.
The 'Select' mode is the initial default
--- as indicated by the 'high-lighted'
(low-lighted?) little red-square icon with
the dotted white-line border.
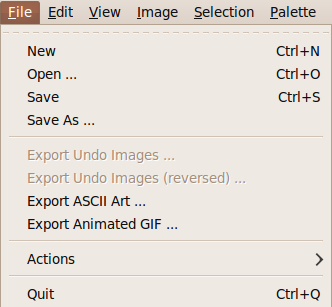
This is the 'File' drop-down menu.
I use 'Save' and 'Save As' heavily
--- and 'Quit'.

This is the 'Edit' drop-down menu.
Note the 'Choose Brush' option.
You can choose a color from a pixel
in the image by using the 'Ctrl' key,
while clicking on the image with mouse-button-1.
Then you can use the 'F3' key to choose
a 'brush' with which to apply the chosen color.
'Copy' and 'Paste' are the other options I use,
occasionally.
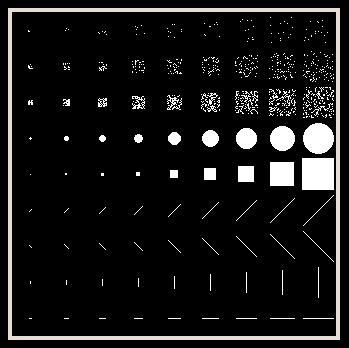
This is the mtpaint 'Brushes' menu.
When you press F3, this image pops up
in a place determined by where you
have the mouse cursor positioned.
I usually use a square or circular 'brush'
--- a solid one. But you may find situations
where a 'spray' or 'line' brush is useful.
Click on a brush type to select the brush.
When you click on this brush-menu-image,
the image disappears and you are ready to
'dab' or 'stroke' with the brush.
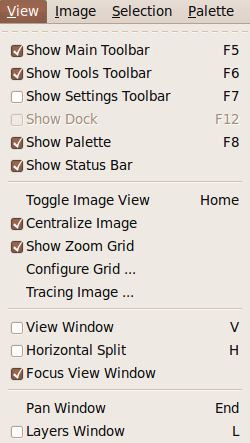
Here is the 'View' drop-down menu.
I leave these show/hide option settings
the way they came 'out of the box'.
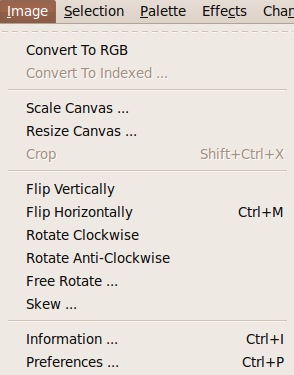
Here is the 'Image' drop-down menu.
This is my 'go to' menu.
Lots of handy options.
I use the 'Crop' option frequently.
Also 'Scale Canvas'.
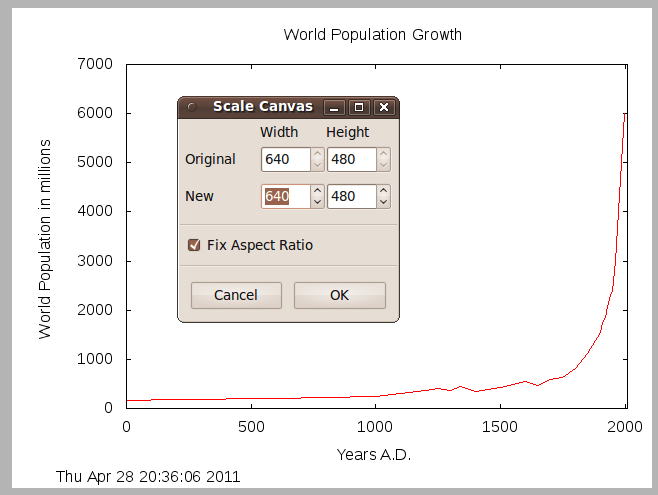
The following image shows what you may see
after choosing 'Scale Canvas ...'
--- a dialog window super-imposed on
the image that you are editing.
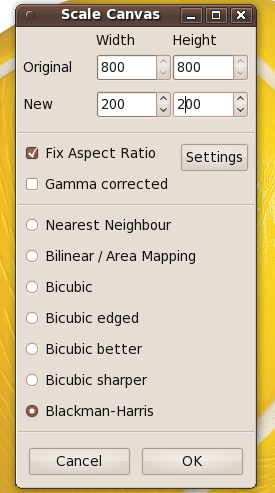
The dialog window above shows
the 'Scale Canvas' dialog
of the 'Image' drop-down menu when
when in 'Indexed' color mode
(for example, when editing a GIF file).
The following image shows the dialog
you will see when editing a JPEG file.
The dialog window above is the
'Scale Canvas' dialog of
the 'Image' drop-down menu
when in 'RGB' mode.
Note that there are many options for
averaging adjacent pixels when you are
not restricted to a paletted ('indexed') image.
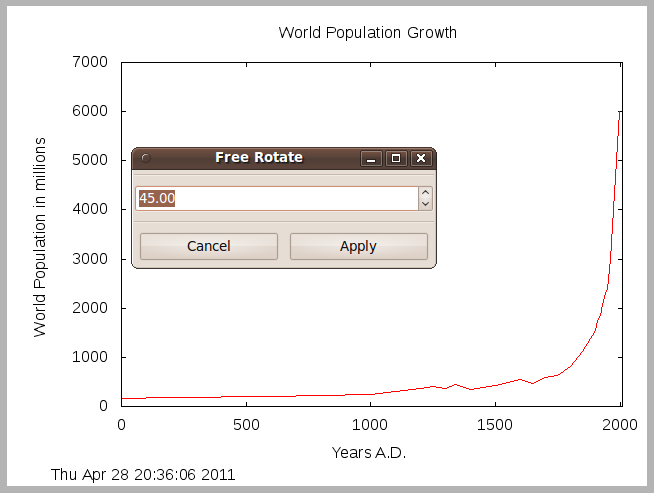
This is the 'Free Rotate' dialog of
the 'Image' drop-down menu.
This option is handy if you took a photograph
and the camera was not level.
You can adjust one or two degrees,
or even a fraction of a degree.
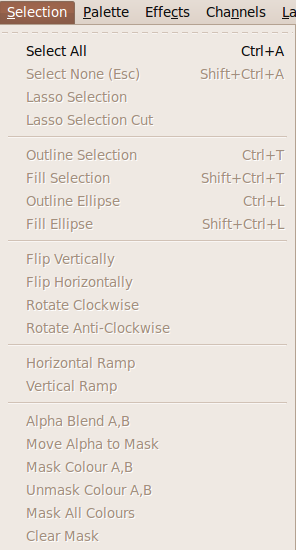
This is the 'Selection' drop-down menu.
Most of these options are grayed-out
until a portion of the image is selected.
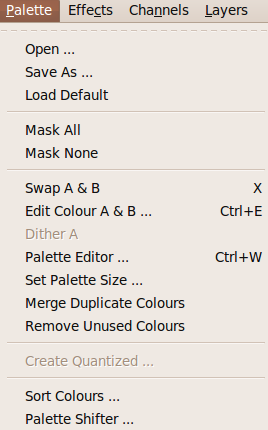
This is the 'Palette' drop-down menu.
I have never used it.
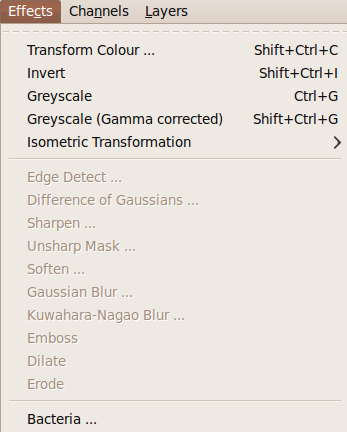
This is the 'Effects' drop-down menu.
Some of the grayed-out options,
such as Blur options, can be activated
by switching from 'Indexed' color mode
to 'RGB' color mode on the 'Image' menu.
![]()
This is the 'Transform Colour' dialog
from the 'Effects' drop-down menu.
I mainly use the 'Gamma' option ---
to lighten or darken images.
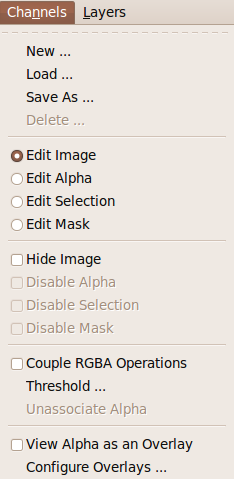
This is the 'Channels' drop-down menu.
I have never used it.
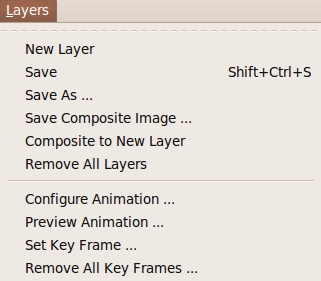
This is the 'Layers' drop-down menu.
I do not use it --- after my unpleasant
experience documented above.
I have never really needed it anyway.
An artist would almost surely need
to use it. Luckily, I am not an artist.
|
How to activate a 'grayed-out'
Short story: I found it very frustrating that when I wanted to blur an image (like some black text placed on a white background), I could not do the blur because the 'Blur Effects' options in the 'Effects' toolbar menu were grayed out. (See Irfanview note below.) I did a lot of web searching to find a way to turn the Blur effects on. I finally found a hint in a thread about GIMP, which I found because GIMP has similar behavior. (I tried GIMP when I could not do the blur in mtPaint.) In the 'mtPaint' 'Image' toolbar menu is the option 'Convert to RGB'. This will convert your image from a palette-based image (limited to 256 colors) to a 'true color' (16 million color limit) type of image. The 'Blur Effects' (and about 8 other effects) in the 'Effects' drop-down menu become active (not grayed out) when you switch your image to 'RGB'. This was a frustrating experience for me because, in several years of using 'Irfanview' on MS Windows, its blur option would work even if you were editing a palette-based file, like a GIF file with only a couple of colors in the palette. Apparently, underneath the covers, Irfanview would automatically make a conversion to a larger palette --- or to a 'true color' image type.
NOTE: In 'Irfanview', whenever I would read in a palette-based file, like a GIF file, I could save it as a JPEG file. No problem. In the Irfanview 'Save as..' dialog, simply specify JPEG (and choose from several JPEG options in a GUI, including a compression value.) In contrast, the 'mtPaint' 'Save As ..' dialog window will NOT present a JPEG option in the 'File format' options button. However, I know a JPEG option is available because it is among the 'File format' options if I read in a JPEG file for editing. It indeed turns out that by using 'Convert to RGB', one will have the option of saving an originally palette-based file as a JPEG.
< Go to Table of Contents, above. >
mtPaint pixel editing : I find that you can edit down at the pixel level by using a toolbar option to zoom in 800 percent. Below is a tutorial using the 800% zoom and pixel editing. This tutorial was posted in a single, tall image --- by 'pyrestriker' at the artist-contributions site 'deviantart.net'. I have broken the image up into 13 separate images and added a few notes. The goal of this tutorial is to make what looks like a little red ball --- that looks shaded and with a glint of light reflected off of it. The ball is about 22 pixels by 22 pixels. |
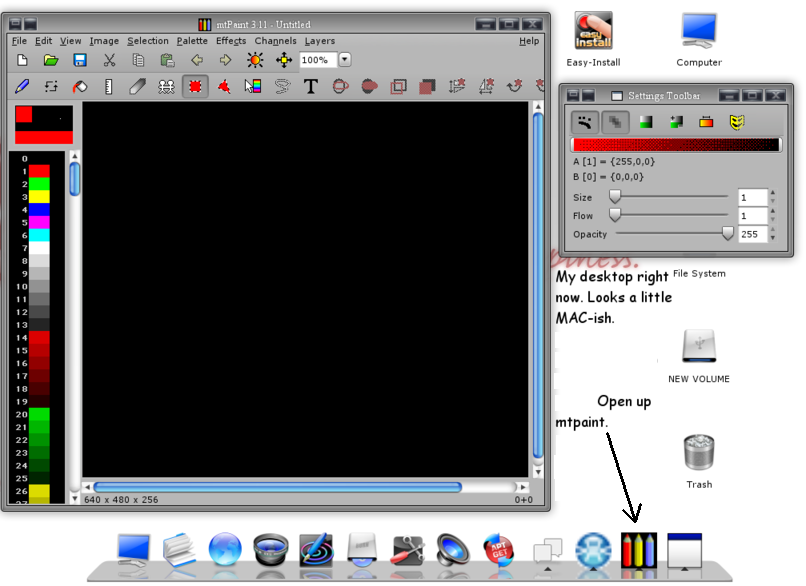
This is apparently a MAC-ish Linux desktop,
with a 'docker' along the bottom,
like the one seen in the Mac OS.
Note the icon for the mtpaint program.
Note that the zoom is initially set at
100% when mtpaint starts up.
(You probably won't see the Settings toolbar
on the right. It will probably be turned off
'out of the box', unless you choose to un-hide it.)
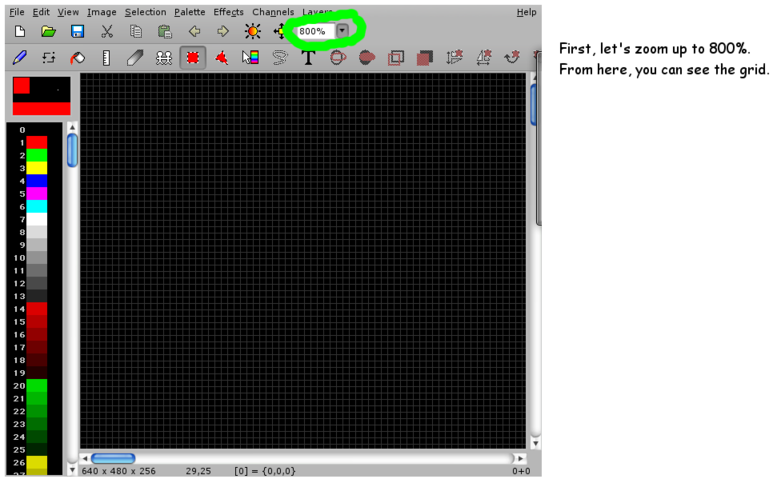
Zoom to 800%.
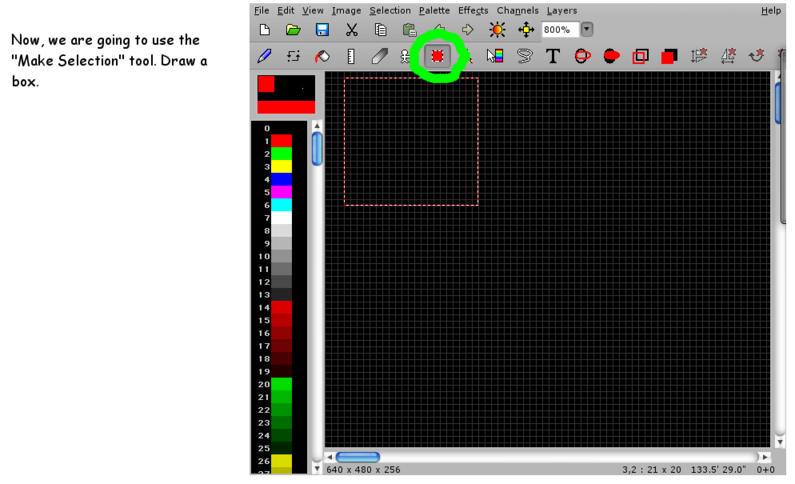
Choose the 'Make Selection' icon.
Select a square area.
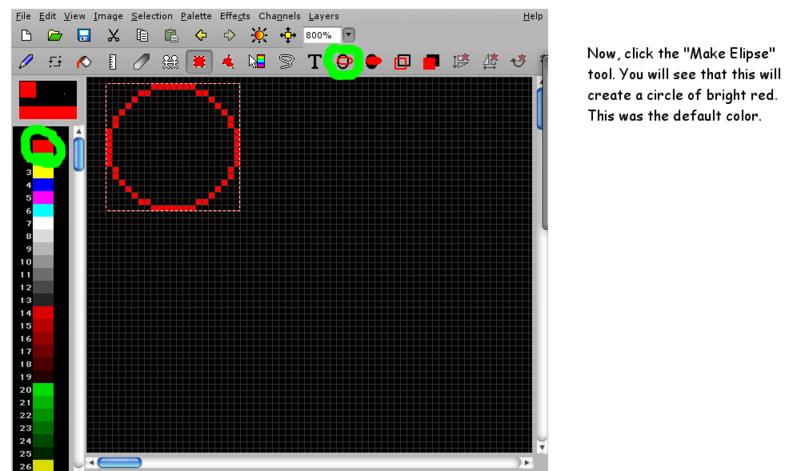
Click the 'Make Ellipse' tool.
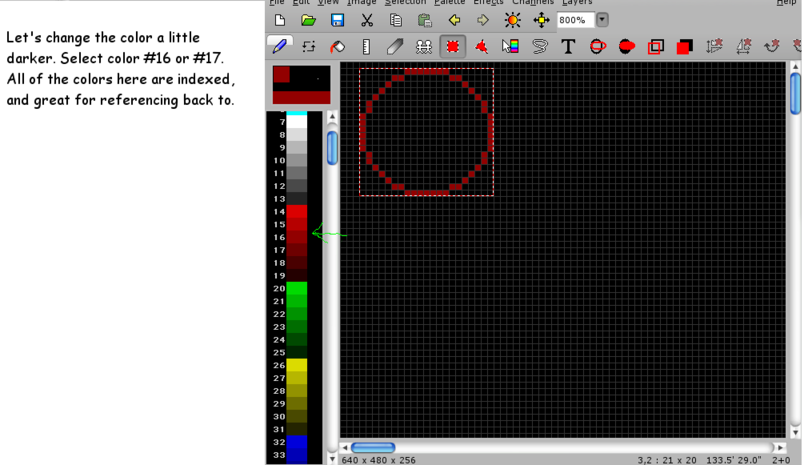
Change the color via the
palette of colors on the left.
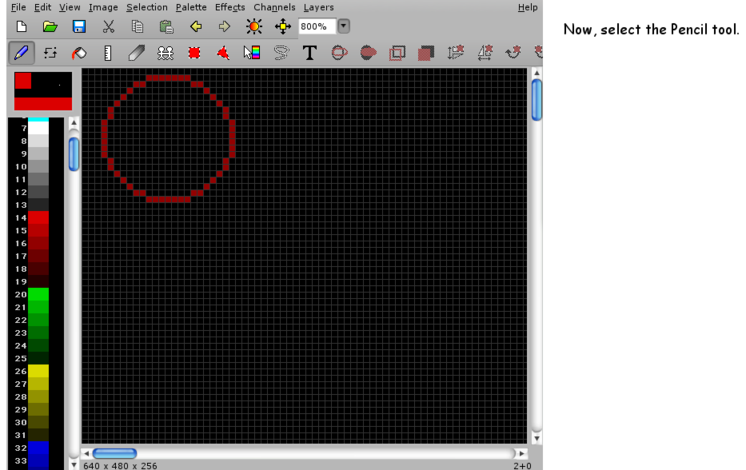
Select the Pencil tool, on the left.
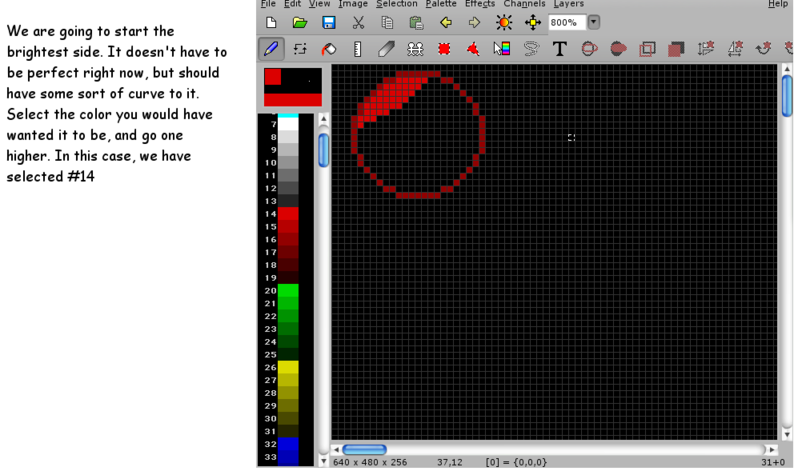
Start poking at pixel squares.
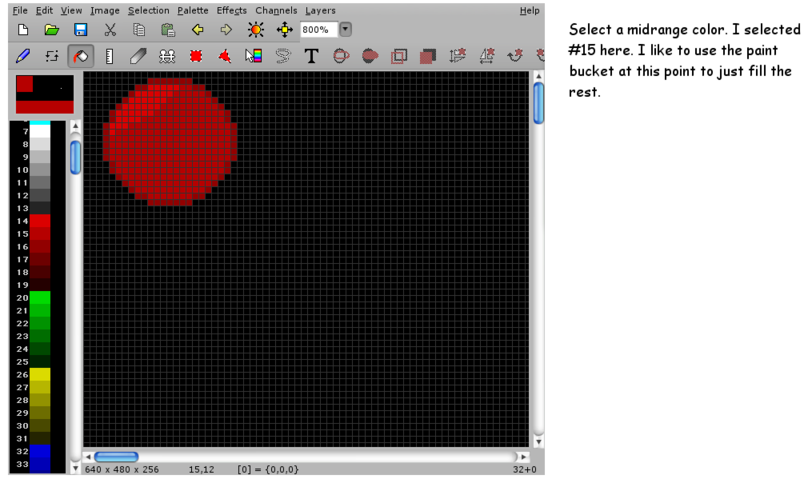
Poke more pixels with
a darker red selected.
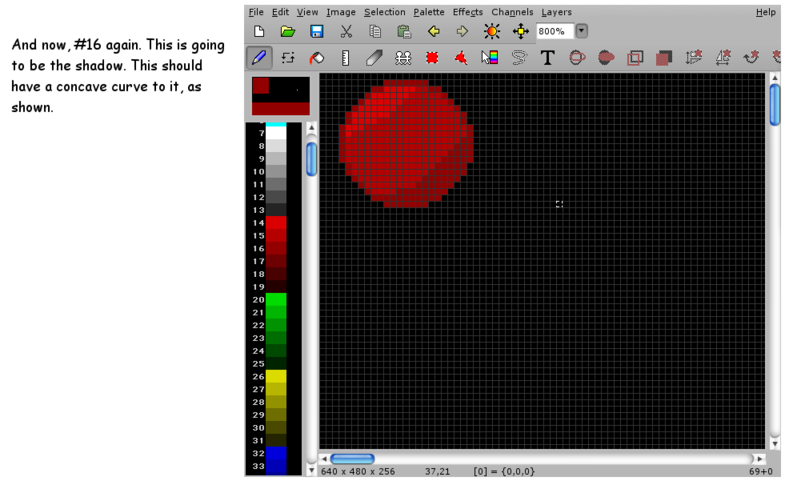
Poke more pixels with
an even darker red selected.
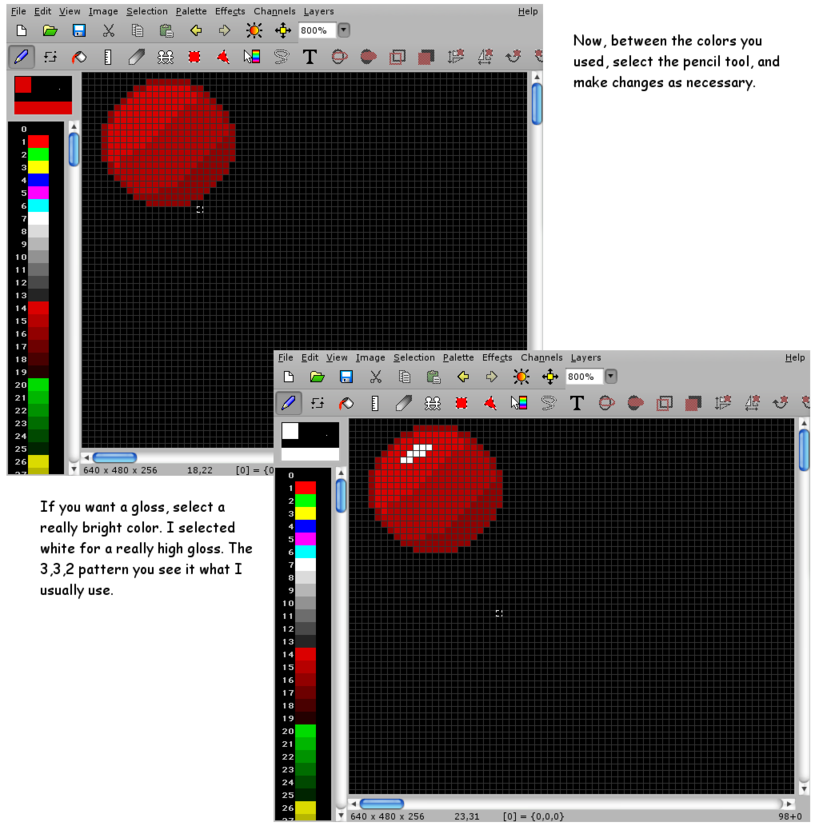
Add a highlight with a bright color.
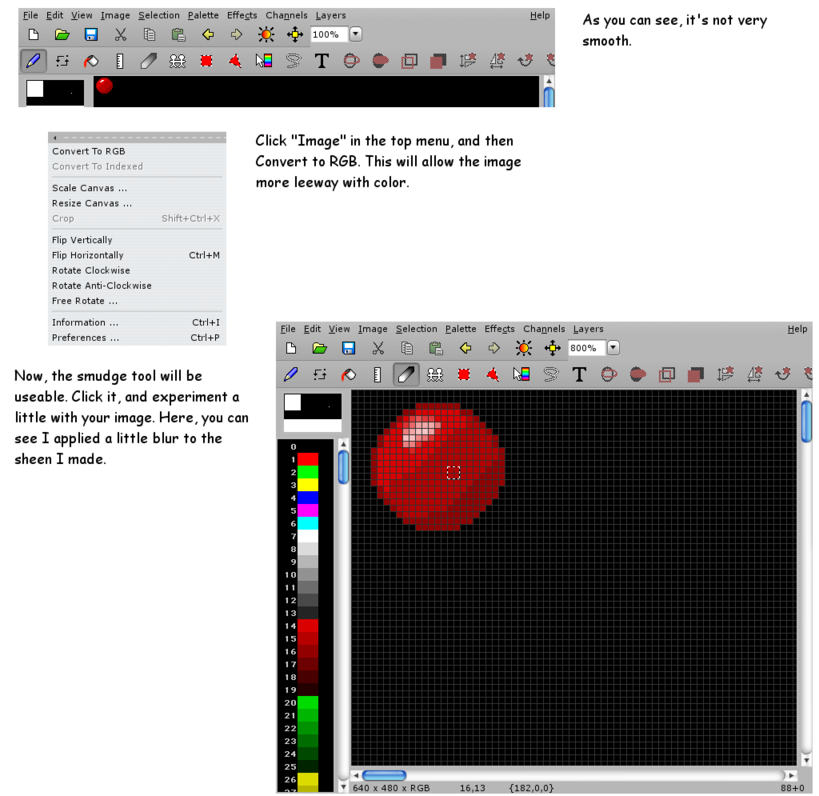
Switch to RGB mode and use
the Smudge tool on the highlight.
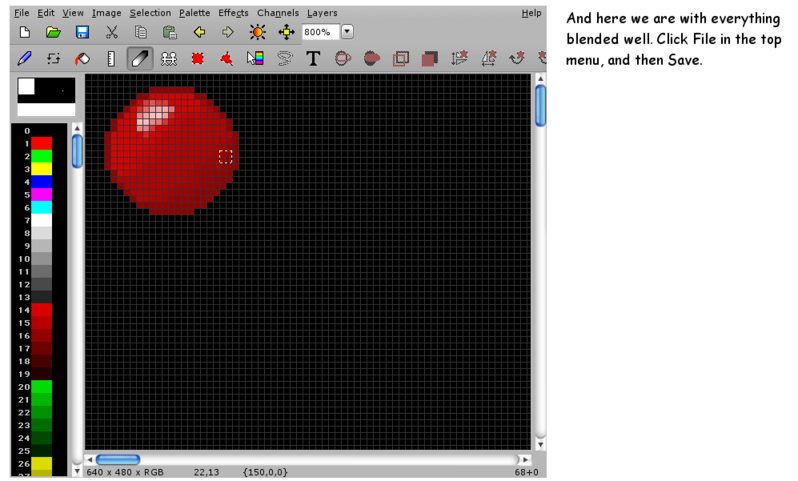
Click File and Save.
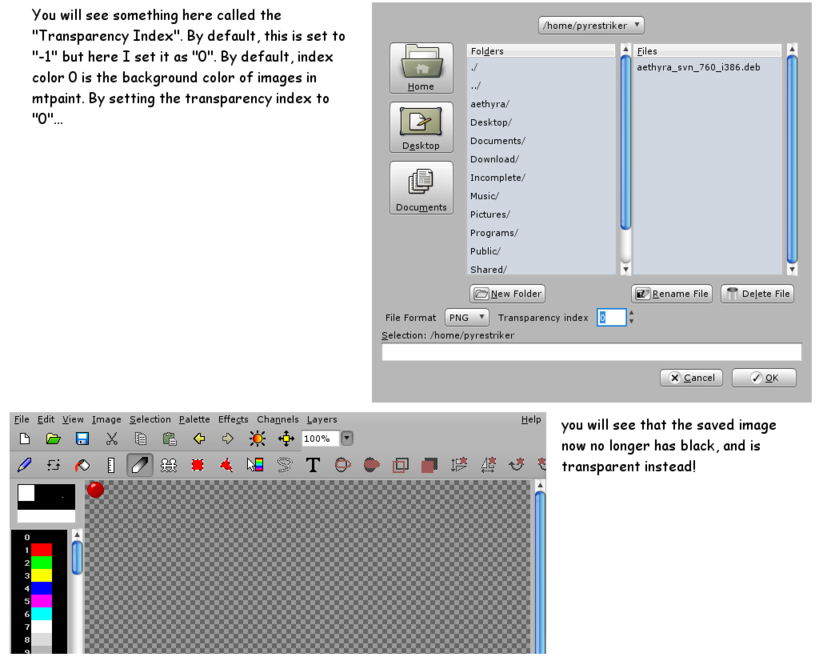
Set the 'Transparency Index'
(for a PNG file) to zero.
Note that the image was developed as a
640x480 image (as seen in the bottom
status line in previous images) even though
the ball is only about 22x22. See the little
red ball at the upper left of the 'canvas'?
I would use the 'Image > Crop' option
to crop this 640x480 image
down to a small image with relatively
few transparent pixels.
|
EXTERNAL LINKS concerning 'mtPaint' :
|

An 'nl' (Netherlands language) screenshot.
Note the nine menu names in the top menu bar
--- in Dutch.
Note the image size (pixels) and palette depth
at the bottom-left in the status bar.
|
Bottom of this To return to a previously visited web page location, click on the Back button of your web browser, a sufficient number of times. OR, use the History-list option of your web browser. OR ...
< Go to TOP of this page, above. >
Page history:
Page was created 2010 May 14.
|